Services









0% Interest Payment Plan Get Your New Roof Financed
We aim to help you solve your home improvements & repair issues without disturbing your household cashflow


A leaking gutter might not seem like a big deal, but left unchecked it causes roof damage, water pooling around your foundation, and internal wall leaks. Fortunately, most minor leaks can be fixed with the right tools and a bit of know-how.
This complete guide walks you through how to identify, repair, and prevent leaking gutters — with specific fixes by leak location, what to buy from Bunnings, real cost breakdowns, and clear guidance on when a DIY fix is not enough.
Some gutter leaks are obvious. Others develop slowly over months and only reveal themselves through secondary damage inside or around your home. Catching them early is the difference between a $30 tube of sealant and a $3,000 wall repair. Watch for these signs:
If you’re seeing damp patches on internal ceilings, the gutter leak may have already progressed to a roof leak. Read our guide on how to find and repair a roof leak to check whether the issue goes deeper than the gutter itself.
Different leak locations need different repair approaches. Using the wrong method wastes time and often fails within weeks. Match the fix to where the leak is actually coming from.
Corner joints are the highest-stress point in any gutter system. The sealant here takes the full force of changing water direction and thermal expansion. To fix a leaking gutter corner: disassemble the corner piece if possible, scrape out all old sealant with a putty knife, clean both mating surfaces with a wire brush, dry thoroughly, then apply a fresh bead of polyurethane gutter sealant to both contact surfaces before reconnecting. Run your gloved finger along the joint to press the sealant into any gap. Allow 24 hours to cure before testing.
Leaky gutter seams almost always mean the original sealant has failed. You do not need to replace the gutter section — just reseal. Clean the seam area inside the gutter with a wire brush to remove old sealant, rust, and debris. Dry completely. Apply polyurethane sealant along the full length of the seam on the inside of the gutter, pressing it firmly into the overlap. If the sections have separated slightly, use a pop rivet gun to pull them back together before sealing. Do not just run sealant over the outside of the seam — that traps water behind the repair and fails faster than doing nothing.
End caps can work loose or crack with age. If the end cap is still structurally intact, remove it, clean both the cap and the gutter end with a wire brush, apply a generous bead of sealant to the inside lip of the cap, and press it back into place. Hold or clamp it for a few minutes while the sealant grabs. If the cap is cracked or broken, replace it — end caps are inexpensive and available at any hardware store. Applying sealant over a broken end cap is a temporary measure at best.
This is one of the trickier leak types because the water appears to be running down the wall behind the gutter rather than dripping from it. The cause is usually a failed back flashing, a gutter bracket pulling away from the fascia, or the gutter itself sitting proud of the fascia and allowing water to travel behind it. Check whether the gutter bracket is still flush with the fascia — if it has pulled out, re-screw it with longer screws into solid timber. If the flashing behind the gutter has failed or was never installed, this is a job for a licensed roofer. Learn more about how fascia and gutters work together before attempting this repair yourself.
Small holes (under 5 mm) can be filled with polyurethane sealant directly. Larger holes and corroded patches need a physical patch: cut a piece of aluminium flashing 50 mm larger than the hole in all directions, bed it in sealant, press it firmly into place, seal all edges, and secure with pop rivets if the patch spans a structural section. For gutters where the corrosion covers more than 300 mm of run, or where the metal is paper-thin around the hole, replacement of that gutter section is the better long-term call.
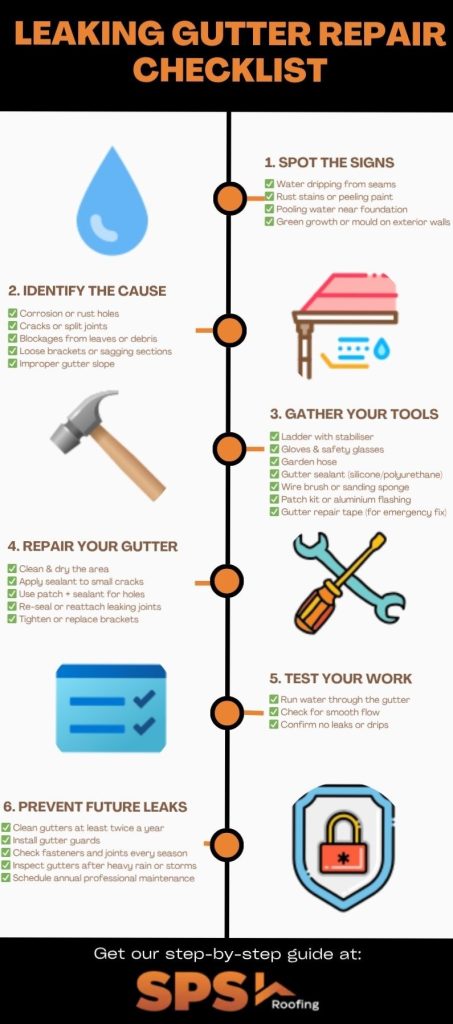
On a dry day, run water through the gutter with a garden hose starting at the closed end. Walk the length of the gutter and watch for drips, pooling, or water escaping at joints. Mark each leak point with chalk or masking tape before climbing down — you will forget exactly where they were otherwise.
Use a sturdy ladder with a stabiliser bar that hooks over the roofline — never rest the ladder directly against the gutter itself or you will bend it and create a new leak. Place the ladder on level ground and have someone hold the base. Wear gloves (gutter edges are sharp) and eye protection. Never work on a wet roof or in windy conditions.
Remove all debris from inside the gutter near the leak. Use a wire brush to scrub away rust, old sealant, flaking paint, and oxidation. Rinse with the hose, then dry the area completely — sealant applied to a damp surface will not bond and will peel off within weeks. On a sunny Sydney day this takes 20-30 minutes of drying time; in cooler weather, use a rag and allow longer.
Use the repair method matched to your leak location from the section above. For sealant applications, apply a continuous bead without gaps, smooth with a gloved finger, and do not rush it. For patches, bed the patch fully in sealant before pressing down — a dry-fit patch with sealant only around the edges will always lift. Allow the sealant to cure fully per the product label before testing (typically 24 hours for polyurethane, 1-2 hours for silicone).
While you’re up there, check that the gutter has a continuous fall toward the downpipe. Hold a spirit level along the gutter run. If you find a sag (usually where a bracket has failed), tighten or replace the bracket and re-adjust the gutter to its correct fall. A gutter that pools water will develop a new leak at the lowest point regardless of how well you seal the current one.
Run water through the gutter again and watch each repair point carefully. Check that water flows to the downpipe without pooling. If the repair holds, finish with a coat of weatherproof gutter paint over the patched area to protect the sealant from UV degradation and match the rest of the run.
If you’re caught mid-storm, self-amalgamating rubber tape or waterproof butyl gutter tape applied to a dry surface can hold a leak for days to weeks. It is not a permanent fix — it buys time. Plan the permanent repair as soon as conditions allow. Before the next storm season, also consider a pre-storm gutter clean to remove the debris that accelerates leaks in the first place.
If you’re heading to Bunnings or a hardware store, here’s what to look for — without needing to know brand names:
A basic gutter repair kit from a hardware store typically costs $25-$60 and handles most small-to-medium DIY jobs. For a full section reseal, budget $15-$30 per cartridge of sealant.
| Repair Type | DIY Cost | Professional Cost (Sydney) |
|---|---|---|
| Seam or joint reseal | $15–$30 | $150–$300 |
| Corner repair | $20–$40 | $150–$250 |
| Hole patch (small to medium) | $25–$60 | $180–$350 |
| Section replacement (per metre) | $20–$50/m (materials) | $80–$150/m installed |
| Full gutter replacement (single storey) | Not recommended DIY | $1,200–$3,500+ |
| Water damage from ignored leak | $3,000–$15,000+ depending on extent | |
The factors that move professional pricing up or down in Sydney: whether the home is single or multi-storey, how accessible the gutter run is, whether scaffolding or a boom lift is needed, and the material type (Colorbond sections cost more than PVC). Most licensed roofers and gutter specialists charge a minimum callout fee of $120-$180 regardless of how small the job is, so it’s worth having them check the full run while they’re there rather than just fixing the one leak you found.
On the insurance question: if the gutter leak was caused by a storm, hail, or a fallen tree, the repair may be covered under your home insurance policy. Check your PDS and photograph the damage before any repair work begins. For broader roof cost context, see our guide on roof restoration costs in Sydney.
The most effective thing you can do is keep your gutters clean. Blocked gutters force water over or through the weakest point in the system — which is always a seam, joint, or corroded section. In Sydney, gutters should be cleaned at minimum twice a year: once before the summer storm season (October) and once after the autumn leaf fall (May). If you have large trees overhanging the roofline, quarterly cleaning is more realistic.
For a full seasonal checklist, see our step-by-step guide to cleaning gutters safely.
DIY gutter repair is appropriate for single-storey homes with accessible gutters and localised leaks. Call a licensed roofer if any of the following apply:
SPS Roofing offers fast, affordable gutter repair and replacement services across Sydney. If you are not sure whether your situation is a DIY fix or needs a professional, a call or photo to our team will get you a straight answer.
Yes. When a blocked gutter overflows, water backs up under the first row of roof tiles or behind the gutter’s back flashing. Over time this saturates the timber fascia and can work its way into the ceiling cavity. It’s one of the most common causes of internal water damage that homeowners assume is a roof problem but is actually a gutter maintenance problem. Clearing the gutter resolves the overflow; if internal damage has already occurred, a roofer needs to inspect the fascia and sarking.
Yes, in exactly the way described above. Overflowing water doesn’t just run down the outside wall. On many Australian homes the gutter sits close to the fascia and roofline, and sustained overflow forces water under the roof membrane or into the eave cavity. A ceiling stain near an exterior wall after heavy rain is often the first sign that gutters have been overflowing for some time.
Polyurethane gutter sealant typically lasts 8-12 years in Australian conditions before UV degradation and thermal cycling cause it to crack or peel. Silicone sealant is more UV-resistant but less flexible and typically lasts 10-15 years. The actual lifespan depends heavily on exposure: a gutter in full north-facing sun in western Sydney will degrade faster than one under eave shade in a southern suburb. If your gutters have not been resealed in over 10 years, a preventative reseal of all joints is worth doing before leaks develop.
Full gutter replacement on a standard single-storey Sydney home typically costs $1,200-$3,500 depending on the linear metres of gutter run, the material (Colorbond, PVC, or aluminium), and access difficulty. Per-metre rates for supply and install range from $80-$150/m. Multi-storey homes requiring scaffolding cost significantly more. If only sections of gutter are damaged, section-by-section replacement at $80-$150/m installed is usually more economical than a full replacement.
Polyurethane gutter sealant is generally the best choice for Australian conditions. It remains flexible after curing, which means it can handle the thermal expansion and contraction that cracks rigid sealants over time. It bonds to Colorbond, aluminium, zinc, and PVC. Look for a product rated for outdoor/UV exposure and labelled for roofing or gutters specifically. Avoid general-purpose silicone for metal gutter joints — it doesn’t handle thermal movement as well.
You can reseal a gutter joint in place without removing the gutter section. Clean the joint from the inside with a wire brush, dry it thoroughly, then apply polyurethane sealant along the full length of the joint on the inside surface. Smooth with a gloved finger and allow 24 hours to cure. If the joint has separated slightly and water is getting through a physical gap, use a pop rivet gun to pull the sections back together before sealing. Applying sealant only to the outside of the joint does not work — water running inside the gutter will still find its way through the gap.
It depends on the cause. If the leak resulted from a storm, hail, fallen branch, or other sudden insured event, most standard home insurance policies will cover the repair cost. If the leak is due to wear and tear, corrosion over time, or lack of maintenance, it is generally not covered. Always photograph damage before any repairs begin and notify your insurer promptly. Check your PDS for specific exclusions — policies vary significantly between insurers on gutter-related claims.
We aim to help you solve your home improvements & repair issues without disturbing your household cashflow

No catches or gimmicks. Have an option to spend now, pay later!

Apply & have an outcome in minutes!