 Services


0% Interest Payment Plan Get Your New Roof Financed
We aim to help you solve your home improvements & repair issues without disturbing your household cashflow

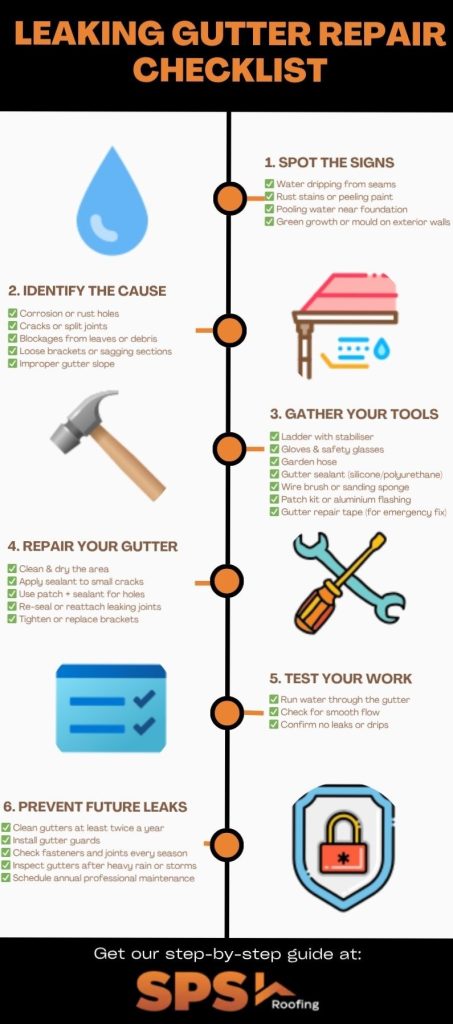
Noticed Water Dripping from Your Gutters?
A leaking gutter might not seem like a big deal, but over time, it can cause roof damage, water pooling around your foundation, and even internal wall leaks. Fortunately, most minor leaks can be fixed easily if caught early.
This complete guide will walk you through how to identify, repair, and prevent leaking gutters with clear steps, tools needed, and expert tips tailored for Australian homes.
Before you can fix a leaking gutter, you need to know it's leaking in the first place. While some issues are obvious like water dripping from the middle of the gutter others are more subtle and develop over time. Catching the early warning signs can help you prevent extensive water damage and avoid costly repairs down the track. Here are the most common signs to watch out for:
Ignoring these signs can result in expensive structural damage and unwanted pests.
Before starting any gutter repair, it’s essential to have the right tools and materials on hand. This not only ensures a smoother repair process but also helps you achieve a longer-lasting fix. Whether you're sealing a small crack or patching a larger hole, having the proper equipment will make your job safer, faster, and more effective. Here’s what you’ll need:
Before climbing up, make sure you’re equipped for safe work at height.
You can’t fix what you can’t see. On a dry day, run water through your gutter using a garden hose to mimic rainfall. Start at one end and observe the flow. Look for drips, leaks, or water escaping at joints or holes. Mark the leak locations with a piece of chalk or tape so you can return to them easily.
A clean surface is essential for any sealant or patch to stick properly. Remove leaves, dirt, or gunk near the leaking area using your gloved hand or a gutter scoop. Use a wire brush or sanding sponge to remove rust, flaking paint, or oxidation. Rinse with water and allow the area to fully dry before applying any repair materials.
Now it's time to fix the leak using the right method for its size and location.
Loose brackets or misaligned gutter sections are a common cause of leaks. Check all brackets, screws, and joints around the leak. Tighten any loose fasteners with a screwdriver or cordless drill. If a bracket is broken or rusted, replace it with a new one to ensure the gutter holds its position and slope properly.
Once everything is sealed and secured, give it a final test:
After finishing the repair, consider painting over the patched area with weatherproof gutter paint to protect it from UV and moisture damage—and to match the rest of your guttering for a cleaner look.
Caught during a storm? Use gutter repair tape or waterproof duct tape as a short-term solution. Make sure to replace it with a permanent fix as soon as the weather allows.
Fixing a leaking gutter is a great first step—but prevention is what truly protects your home in the long run. By adopting a few simple maintenance habits, you can significantly reduce the risk of future leaks, extend the life of your gutter system, and avoid costly repairs. Here are some practical ways to keep your gutters leak-free all year round:
DIY isn't always the right answer. Call a professional if:
SPS Roofing offers fast, affordable gutter services in Sydney done right the first time.
A leaking gutter may seem like a minor issue, but it can turn into a major repair job if ignored. With the right tools and a bit of time, you can often fix it yourself—but when in doubt, always turn to the experts.
Trust the team at SPS Roofing for fast and reliable leaking gutter repair in Sydney and surrounding suburbs.
We aim to help you solve your home improvements & repair issues without disturbing your household cashflow

No catches or gimmicks. Have an option to spend now, pay later!

Apply & have an outcome in minutes!
